Writing tests for the Parallax Library
Please share this post if you enjoy it!
Writing unit tests for javascript
Tests are super important in any project but especially so in open source projects that are going to be contributed to by many different people and used by many people. We want to have confidence that the code is correct and no bugs are being introduced by new changes etc.
Tests are what allow us to have that confidence. If a change is made and it doesn’t break our tests - assuming our tests are good - we can be confident the change it correct. With tests we don’t have to spend as much time manually testing all use cases when someone makes a change to the code.
Setting up Jest
We are going to be using jest to write unit tests for our library. Before we get going we are going to need to install jest and get our project set up to use it nicely.
You can take a look at the getting started documentation here:
Jest getting started documentation
We will also want to use babel with jest to allow us to use some more modern javascript features, so you can check this out to see how to do that:
OR If you just want to know what you need to install, run the following:
1
yarn add --dev jest @babel/core babel-jest babel-core@^7.0.0-bridge.0
This will install jest and the required packages to get babel working with jest.
We want some npm scripts that we can call to run our tests while we are developing so add the following to the “scripts” object in your package.json.
1
2
"test": "jest",
"test:watch": "jest src --watch --notify",
This will allow us to run yarn test to run our tests once or we can call yarn test:watch to run the tests every time a change is made. Jest is also really clever and you can tell it to only run the tests that are to do with the files that have changed, instead of just running all tests every time a change is made. Clever jest.
If you want, you can also run
1
jest --init
and answer the questions to create a jest.config.js file with extra configuration for jest.
Now write some tests
We have ourselves all set up with jest now so we can jump in and start writing the tests we need.
Our library relies on scroll events that are fired in the browser, so how will we mock that behaviour during our tests when there is no browser and therefore no scrolling? Well, fortunately jest exposes an object called global that acts like the window object in the browser. This will allow us to then mock things like addEventListener.
So we will create a new file in the tests directory called test.spec.js and we will put the following at the top:
1
2
3
4
5
6
7
8
9
import ParallaxProvider from '../src';

let events = {};
beforeEach(() => {
  events = {};
  global.document.addEventListener = jest.fn((event, cb) => {
    events[event] = cb;
  });
});
beforeEach gets called before every test we run, so what we are doing here is before every test we are defining a method called addEventListener on the document object within the jest global object and we are telling it that it is a jest function that accepts two arguments, an event name and a callback. Using jest functions like this like allows us to make assertions that check if the function has been called, how many times, and with what arguments.
We are also populating an events objects with the key for event name and the callback as a value.
What this means is when our library calls
document.addEventListener('scroll', () => {
  // scroll code
});
jest will trigger the global addEventListener function and pass in ‘scroll’ and the function. That will the populate the events objects with the key ‘scroll’ and the callback as the value. That events objects is defined globally in the test file so we are able to then call events.scroll(); anywhere in our tests and it will trigger the callback function in our library!
Describe blocks
Describe blocks are used in tests to group similar tests together. Maybe those tests need the same setup to execute for example, so inside the describe block there can be a beforeEach call and that will only run on the tests defined in that describe block. Effectively sandboxing those tests from the rest.
Here we will create a describe block that will run all tests that involve multiple sections.
1
2
3
4
5
6
7
8
9
10
11
12
13
14
15
16
17
18
19
20
21
22
23
describe('scroll events with multiple sections', () => {
  let sectionOneCtrl = jest.fn();
  let sectionTwoCtrl = jest.fn();
  let sectionOneDur = 500;
  let sectionTwoDur = 800;

  beforeEach(() => {
    const p = new ParallaxProvider([
      {
        mountPoint: 0,
        duration: sectionOneDur,
        controller: sectionOneCtrl,
      },
      {
        mountPoint: 0,
        duration: sectionTwoDur,
        controller: sectionTwoCtrl,
      },
    ]);
  });

  // Rest of test code
});
Again we are using jest.fn() so we can make assertions about if and how the functions where called.
Inside the beforeEach we create a new instance of our library with two sections configured.
Now we can start writing actual tests.
At the bottom of the above describe block we can place the following:
1
2
3
4
5
6
test('calls window.addEventListener() for scroll event', () => {
  expect(global.document.addEventListener).toHaveBeenCalledWith(
    'scroll',
    expect.any(Function),
  );
});
Here we are testing to ensure that the addEventListener was actually called and specifically it was called with the first argument ‘scroll’ and the second argument was any function.
The syntax for jest assertions like this is very intuitive. Just reading it with no knowledge of jest you can still guess what it is doing. In English it is saying this: “I expect that the global function called addEventListener should have been called with the following arguments: ‘scroll’ and any function”. Beautiful.
This is really all there is to testing. We write some code that sets up the variables and objects we need then we write some assertions and expectations for what should occur if everything is working correctly.
Actually running the test
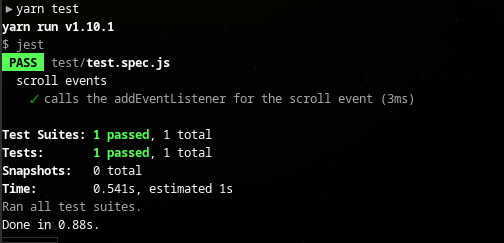
Now that we have written a test we want to run it and see if it actually passes. We do this by running
1
yarn test
In the terminal. Jest will magically find our test file and run the tests then report back to us about how things went. We should get the following output:
For ease we can now run
1
yarn test:watch
You will be met with the following screen:
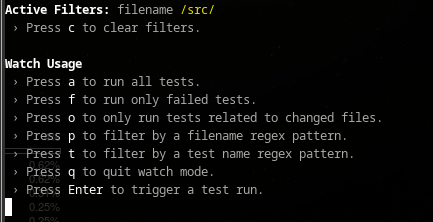
I usually hit “a” or “o” depending on how many tests I have. Jest will now watch for changes in our files and rerun the tests when things have changed. Wonderful stuff.
Note: just as a sidenote about testing in general I would like to say that you should try to start by making the test fail then change things to make it succeeed. Sometimes if you write the test to immediately pass there may be an issue with it that you missed and you just assume it is right because the test passes.
It is much better to verify that the test fails when the conditions aren’t met then pass when things are changed back to the correct condition
Moar tests plz
Let’s run through a few more tests for our library.
1
2
3
4
5
test('it calls the controller on scroll', () => {
  events.scroll();

  expect(sectionOneCtrl).toHaveBeenCalled();
});
Here we use the events object we created earlier and call the scroll function. This triggers our library to run the code in the scroll event listener. Then we asserts that we expect sectionOneCtrl should have been called. This is the controller defined in the beforeEach of the current describe block. If our code is working correctly, that controller should have been called whent he scroll was triggered.
Note: touching on the idea of making the test fail first we could comment out the event.scroll() line above. If we do that the scroll listener should never be called and therefore the controller for each section shouldn’t be called either. So with that line commented out the assertion should now fail and therefore the test should fail. Uncommenting the line should then bring the test back into a passing state.
Doing this kind of thing for each test we write is just a quick sanity check to make sure that the test is actually doing what we thing it should be.
How does jest know how far we scrolled
Some of you may be thinking that it’s all well and good that we are able to trigger the callback for the scroll listener but we are also checking for window.pageYOffset in our library. How do we get that into there?
By using the jest global object again of course!
1
2
3
4
5
6
7
8
9
10
test('correct offset when scroll is inside the section', () => {
  global.pageYOffset = 10;

  events.scroll();

  expect(sectionOneCtrl).toHaveBeenCalledWith(
    global.pageYOffset,
    sectionOneDur,
  );
});
We manually set the pageYOffset and then trigger scroll. Then we assert our expectations for the arguments that should have been passed into the controller. Given that this is the first section, the offset passed in should just be the total page offset and the duration should be the duration we defined in the configuration for the first section.
The next test is basically the same, but we just use a much larger global scroll offset to see if the library handles it correctly:
1
2
3
4
5
6
7
8
9
10
test('correct offset after section', () => {
  global.pageYOffset = 1000;

  events.scroll();

  expect(sectionOneCtrl).toHaveBeenCalledWith(
    global.pageYOffset,
    sectionOneDur,
  );
});
Section two tests
Now moving onto tests for section two.
1
2
3
4
5
6
7
8
9
10
11
12
13
14
15
16
17
18
19
20
21
22
23
24
25
26
27
28
29
30
31
32
test('correct offset when before section two', () => {
  global.pageYOffset = 10;

  events.scroll();

  expect(sectionTwoCtrl).toHaveBeenCalledWith(
    global.pageYOffset - sectionOneDur,
    sectionTwoDur,
  );
});

test('correct offset during section two', () => {
  global.pageYOffset = 550;

  events.scroll();

  expect(sectionTwoCtrl).toHaveBeenCalledWith(
    global.pageYOffset - sectionOneDur,
    sectionTwoDur,
  );
});

test('correct offset after section two', () => {
  global.pageYOffset = 5000;

  events.scroll();

  expect(sectionTwoCtrl).toHaveBeenCalledWith(
    global.pageYOffset - sectionOneDur,
    sectionTwoDur,
  );
});
These three tests are again basically the same, we just use an offset before, inside and after the section to make sure all get handled properly.
The main difference between these tests and those for the first section is the expectation for the offset value passed into the controller. In the first section we simply expected the offset to be the global scroll offset (this is because section one started at 0). But this time we have to take off the duration of section one from the global offset to get the offset we expect for this section.
Outside the describe block
That is all the tests inside the describe block we created ie all the tests for the basic functionality that we can test without changing the configuration of the sections.
After the describe block write the following tests:
1
2
3
4
5
6
7
8
9
10
11
12
13
14
15
16
17
18
19
20
21
22
23
24
25
26
27
28
29
30
31
32
test('it should handle negative mount point', () => {
  let sectionCtrl = jest.fn();
  let sectionDur = 800;
  let mountPoint = -400;

  const p = new ParallaxProvider([
    {
      mountPoint: 0,
      duration: 500,
      controller: () => {},
    },
    {
      mountPoint: 0,
      duration: 800,
      controller: () => {},
    },
    {
      mountPoint: mountPoint,
      duration: sectionDur,
      controller: sectionCtrl,
    },
  ]);

  global.pageYOffset = 850;

  events.scroll();

  expect(sectionCtrl).toBeCalledWith(
    global.pageYOffset - 1300 - mountPoint,
    sectionDur,
  );
});
Here we simply declare a whole new instance of our library but use a negative mount point for one of the sections and test to make sure the library handles it correctly.
Conclusion
This has been a pretty good introduction to testing a library with jest. The core idea behind testing is to write test cases that mimic all the possible ways a user could use our library. This gives us confidence when we ship the code that there won’t be things going wrong where we expect them to go right.
Obviously just because you are testing doesn’t mean your code doesn’t have bugs in it. There will definitely still be bugs and things you haven’t considered. The point of testing isn’t to eliminate all bugs. It is just to make sure you don’t introduce new ones to the parts that already work.
You will truly be shocked by how many small bugs you can introduce when you try to add a new feature or refactor some of the code. We are only human, we will miss things. But it’s nice to have the tests there to fall back on when we make a change.
I can’t count how many times I’ve made a change that I thought was great and then I run the tests and they are all failing because of something I overlooked. Without tests I would have shipped that bug. With tests my code is that little bit better.
I hope you got something out of this and I will see you back here for the next part where we set up the project with continuous integration and deployment pipeline to push it to NPM.
Stay hungry, and keep coding.
Adrian
Please give this post a share if you enjoyed it. Everyone needs that awesome friend to send them amazing stuff.