AngularJS Quiz App Tutorial Part 11 – More Bootstrap
Please share this post if you enjoy it!
Bootstrapping The Quiz Questions
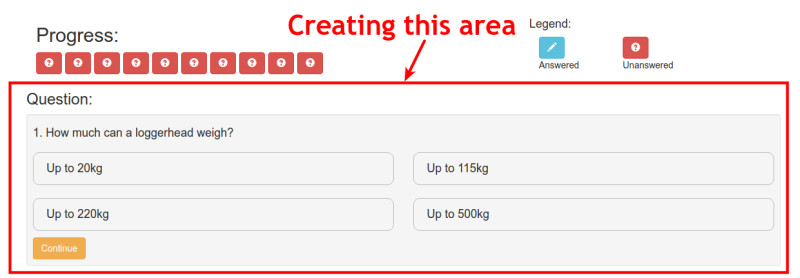
No waiting around here, let’s just jump straight into creating the markup for the questions in the quiz. The whole area will be surrounded in a bootstrap well and we will pull the questions from the data service we created before.
If you want to see the app for yourself, check it out here.
The git repo can be found here.
The base of the HTML shouldn’t be new to you, so I will just show you the code with the bootstrap well and the foundation of the question markup.
1
2
3
4
5
6
7
8
9
10
11
12
13
<div class="row">
  <h3>Question:</h3>
  <div class="well well-sm">
    <div class="row">
      <div class="col-xs-12">
        <!-- Question Area -->

        <h4><!-- The question will go in here --></h4>

      </div>
    </div>
  </div>
</div>
Inside this div is where we will need to add the text for the question as well as all possible answers for that question. We could just ng-repeat all questions, but they would then display all the questions in a column down the page. We want only one question with a continue button to take us to the next (or to use the buttons in the progress section).
So instead, what we will do is to create a property on our controller that indicates the question that is active. Then the corresponding text and possible answers will be displayed for that question. Doing it this way allows us to easily move to the next question by incrementing the active question.
Active Question
First, we need to create the activeQuestion property inside the quiz controller. We will initialise this to 0. This is because we are starting from the first question, which of course, in programming languages tends to start from a 0 index.
This is what our quiz controller looks like thus far.
1
2
3
4
5
6
7
8
9
10
11
12
13
14
15
16
17
18
19
(function(){

  angular
    .module("turtleFacts")
    .controller("quizCtrl", QuizController);

  QuizController.$inject = ['quizMetrics', 'DataService'];

  function QuizController(quizMetrics, DataService){

    var vm = this;

    vm.quizMetrics = quizMetrics;
    vm.dataService = DataService;
    vm.activeQuestion = 0;

  }

})();
To make things look a bit nicer, I like to add the question number before the question. Something like this:
- This is a wonderful question that you will know the answer to.
We could just start with the number one and increment the number as the user progresses through the quiz. The problem there is that that wouldn’t allow the user to go back to a question, which is a feature we want in our quiz.
But we have the activeQuestion property which holds a number of the current question, just in 0 index form. So all we need to do is to add 1 to that value. Then we can print out the text of the question which we get from the question JSON in the dataservice by accessing the index of the active question.
1
<h4>{{quiz.activeQuestion+1 + ". " + quiz.dataService.quizQuestions[quiz.activeQuestion].text}}</h4>
Now We Bring Out The Ng-Repeat Gunz
Directly below the h4 we just created we will create a new row that will house the possible answers. Each answer will take up half the width of the well, so we will give it the corresponding bootstrap class.
On the div for the question, we can use ng-repeat to repeat itself for all four possible answers to the question. This is the code that we will add right after the h4 from the last few paragraphs.
1
2
3
4
5
6
7
8
<div class="row">
  <div class="col-sm-6"
    ng-repeat="answer in quiz.dataService.quizQuestions[quiz.activeQuestion].possibilities">
      <h4 class="answer">
        <!-- Possible answers go here -->
      </h4>
  </div>
</div>
So here we are referencing the possible answers using a long string similar to the one we created to get the question text, except this time we are referencing .possibilities instead of .text. But we are still getting that by finding the activeQuestion index of the quizQuestions property on the dataService which we have access to in the quiz controller.
The ng-repeat has the alias of answer and the possibilities object that we are looping through each have a value of answer, which is the text of the possible answer. Just to jog your memory, here is a snippet of the JSON we are dealing with.
1
2
3
4
5
6
7
8
9
10
11
12
13
14
15
16
17
18
19
20
{
  type: "text",
  text: "What is the typical lifespan of a Green Sea Turtle?",
  possibilities: [
    {
      answer: "150 years"
    },
    {
      answer: "10 years"
    },
    {
      answer: "80 years"
    },
    {
      answer: "40 years"
    }
  ],
  selected: null,
  correct: null
}</pre>
Now using the ng-repeat alias of answer (which will be looping through the object of possibilities) we can reference the answer value in each object. This gives us answer.answer. We will add this like so:
1
2
3
4
5
6
7
8
<div class="row">
  <div class="col-sm-6"
    ng-repeat="answer in quiz.dataService.quizQuestions[quiz.activeQuestion].possibilities">
      <h4 class="answer">
        {{answer.answer}}
      </h4>
  </div>
</div>
Adding Custom Styling To The Questions
The answers may be there right now, but they are certainly not looking pretty like we want them to. So we need to add our own custom styling.
Adding the class of answer to the possible answers h4 will then allow us to add the following to the style.css
1
2
3
4
5
6
7
8
.answer{
  padding: 15px 20px;
  border-radius: 10px;
  border: 1px solid #bbb;
}
.answer:hover{
  cursor: pointer;
}
Creating The Continue Button
This will be a simple case of adding a button element to the HTML just at the bottom of the current bootstrap well. The button will be styled using some bootstrap classes and we will add an ng-click directive to trigger the functionality that will allow us to change the active question (which will in turn, automatically change the text and answers).
1
<button class="btn btn-warning" ng-click="quiz.questionAnswered()">Continue</button>
The function that we reference here is one we have not created yet but that is what we will tackle in the next part of this series.
So I will see you there, in part 12.
Adrian
Please give this post a share if you enjoyed it. Everyone needs that awesome friend to send them amazing stuff.