AngularJS Quiz App Tutorial Part 13 – Ng-if Directive
Please share this post if you enjoy it!
What (ng-)if You Don’t Want To Display It All
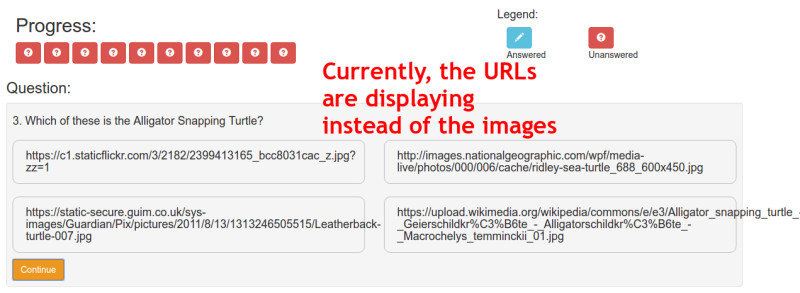
The quiz is starting to look distinctly like a quiz! Go us. But unfortunately, the image questions do not display correctly. They are showing the url instead of the image. In this part we will introduce the ng-if directive to solve that problem.
If you want to see the app for yourself, check it out here.
The git repo can be found here.
The next part can be found here
The way we will solve this is by duplicating the html that displays the possible answers using ng-repeat. Then instead of displaying the text using answer.answer inside an h4, we will add an image using ng-src=”answer.answer”. This way the url is in the place it should be – the src attribute of an image.
1
2
3
4
5
6
7
8
9
<div class="row">
  <div class="col-sm-6" ng-repeat="answer in quiz.dataService.quizQuestions[quiz.activeQuestion].possibilities">
    <div class="image-answer">

      <img ng-src="{{answer.answer}}">

    </div>
  </div>
</div>
Note that we have surrounded the image with a div of class image-answer. This will be used later to make sure that all images are uniform size on the page and not displaying in their native sizes.
However, we now have two blocks of code that will both display. When it’s a text based question, the text will display nicely, but we will also have an image that is trying to fetch a url that doesn’t exist (the text of the possible answers is obviously not a url). We get the opposite problem when it’s an image question.
So what we want to do is somehow only show one of these code blocks depending on what style of question the currently active question is. This is where the ng-if directive comes in.
What Exactly Does This Ng-If Do?
Ng-If achieves the exact functionality we are looking for. It accepts an expression that evaluates to a boolean; if this value is true if will add the html that it is attached to, to the page. If the value is false the html will not be rendered at all.
This may sound similar to what the ng-show and ng-hide directives do, but there is one key distinction. Ng-show and ng-hide are just like adding display: none to the css for that element. The element is still there in the html document, it just cannot be seen on the screen – it is hidden. But ng-if does not even render the html to the page at all.
The reason we are using ng-if here instead of ng-show or hide is because if we use ng-show or hide we will still end up with images that have src attributes that are not urls. The browser will still try to find them as urls and when they can’t they throw errors. Ng-if never allows this scenario and is thus a bit cleaner. We like clean code.
Here is the two blocks of code with the ng-if directives added to both
1
2
3
4
5
6
7
8
9
10
11
12
13
14
15
16
17
<div class="row"
  ng-if="quiz.dataService.quizQuestions[quiz.activeQuestion].type === 'text'">
    <div class="col-sm-6" ng-repeat="answer in quiz.dataService.quizQuestions[quiz.activeQuestion].possibilities">
      <h4 class="answer">
        {{answer.answer}}
      </h4>
    </div>
</div>

<div class="row"
  ng-if="quiz.dataService.quizQuestions[quiz.activeQuestion].type === 'image'">
    <div class="col-sm-6" ng-repeat="answer in quiz.dataService.quizQuestions[quiz.activeQuestion].possibilities">
      <div class="image-answer">
        <img ng-src="{{answer.answer}}">
      </div>
    </div>
</div>
As you can see, this is why we added the question type to the JSON for each question. We can now simply query what the type of the currently active question is and we are done.
MOAR CSS Rules!
There isn’t much css that needs to be added to fix the sizing issues that we are left with on the images. But they need to be done.
1
2
3
4
5
6
7
8
9
10
11
12
.image-answer{
  cursor: pointer;
  height: 350px;
  width: 100%;
  overflow: hidden;
  border-radius: 10px;
  margin-bottom: 20px;
}
.image-answer img{
  width: 100%;
  height: auto;
}
All of this should be pretty self explanatory. It will scale up/down all images to the same size and style them nicely with rounded corners etc. We also add the pointer cursor to indicate it is clickable to the user.
See You In Part 14
That’s all for this part. In part 14 we will add some feedback in the interface to let the user know they have successfully selected an answer.
See you over there in part 14.
Adrian
Please give this post a share if you enjoyed it. Everyone needs that awesome friend to send them amazing stuff.