AngularJS Quiz App Tutorial Part 16 – Error Handling With Bootstrap Alerts
Please share this post if you enjoy it!
Errors Must Be Handled In All Apps
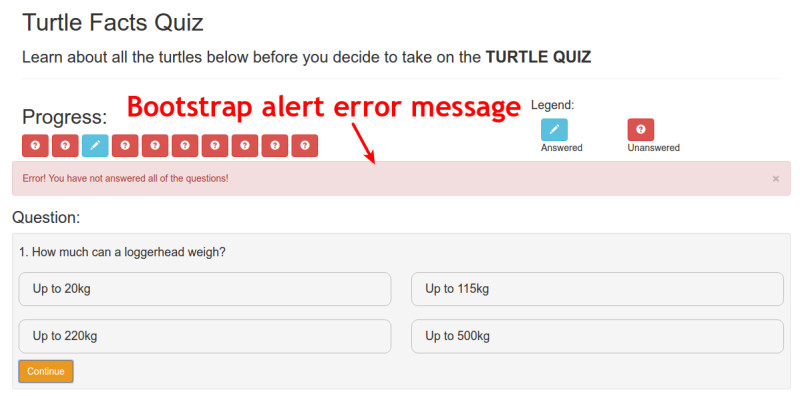
Handling errors is a critical part of the life of a software developer. If you cannot handle errors, you will create code that has a ton of bugs and just doesn’t function satisfactorily. In this part of the series we will use bootstrap alerts to display an error message when the user tries to continue at the last question but they haven’t answered all questions yet.
If you want to see the app for yourself, check it out here
The git repo can be found here.
The next part can be found here
As I mentioned, the error should display when the user is on the last question and continues. If you remember back to the code in the setActiveQuestion function, we have some logic that increments the active question unless it is on the last question, in which case it resets it to 0.
When it resets to 0, it means the user was on the last question and clicked continue without all questions being answered (if all questions had been answered, the setActiveQuestion function would never have been called). This is when we want to display the error.
Using this knowledge of the reset back to 0, we can create a conditional after the potential reset to 0 that checks if it has infact been reset. If it has, then we display the error.
1
2
3
4
5
6
7
8
9
10
11
12
while(!breakOut){

  vm.activeQuestion = vm.activeQuestion < quizLength?++vm.activeQuestion:0;

  if(vm.activeQuestion === 0){
    vm.error = true;
  }

  if(DataService.quizQuestions[vm.activeQuestion].selected === null){
    breakOut = true;
  }
}
Notice inside the new conditional we reference vm.error. We have yet to create this, so add it at the top of the controller where we declare all the other properties. This what the whole quiz controller looks like so far:
1
2
3
4
5
6
7
8
9
10
11
12
13
14
15
16
17
18
19
20
21
22
23
24
25
26
27
28
29
30
31
32
33
34
35
36
37
38
39
40
41
42
43
44
45
46
47
48
49
50
51
52
53
54
55
56
57
58
59
60
61
62
63
64
65
66
67
(function(){

  angular
    .module("turtleFacts")
    .controller("quizCtrl", QuizController);

  QuizController.$inject = ['quizMetrics', 'DataService'];

  function QuizController(quizMetrics, DataService){

    var vm = this;

    vm.quizMetrics = quizMetrics;
    vm.dataService = DataService;
    vm.questionAnswered = questionAnswered;
    vm.setActiveQuestion = setActiveQuestion;
    vm.selectAnswer = selectAnswer;
    vm.activeQuestion = 0;
    vm.error = false;

    var numQuestionsAnswered = 0;

    function setActiveQuestion(index){

      if(index === undefined){
        var breakOut = false;

        var quizLength = DataService.quizQuestions.length - 1;

        while(!breakOut){

          vm.activeQuestion = vm.activeQuestion < quizLength?++vm.activeQuestion:0;

          if(vm.activeQuestion === 0){
            vm.error = true;
          }

          if(DataService.quizQuestions[vm.activeQuestion].selected === null){
            breakOut = true;
          }
        }
      }else{
        vm.activeQuestion = index;
      }

    }

    function questionAnswered(){

      var quizLength = DataService.quizQuestions.length;

      if(DataService.quizQuestions[vm.activeQuestion].selected !== null){
        numQuestionsAnswered++;
        if(numQuestionsAnswered >= quizLength){
          // Finalise Quiz. Will tackle the code to put here later in the course
        }
      }

      vm.setActiveQuestion();
    }

    function selectAnswer(index){
      DataService.quizQuestions[vm.activeQuestion].selected = index;
    }
  }

})();
Next, Create The Markup For The Bootstrap Alert
At the top of the row that holds the question area will be where we place the bootstrap alerts Just above the <h3>Question:</h3>.
The markup to create the alert box is simple. We just need to add the class of alert and the class of alert-danger to make it red. I also added a button with the class of close and the value of × which will create a nice x to close the alert box.
On this button is an ng-click directive that will change the error property back to false which will remove the error box when we click the x button. Instead of calling a function from the ng-click like we have been doing throughout this course, it is also possible to just make an assignment declaration.
Obviously, we only want this alert box to display when the error property is true (then disappear when we hit the close button that sets error back to false). To do this we can use ng-show.
1
2
3
4
5
6
7
8
<div class="alert alert-danger"
ng-show="quiz.error">
Error! You have not answered all of the questions!
<button class="close" ng-click="quiz.error = false">×</button>
</div>
This works because quiz.error is already a boolean value, so as it changes it will show and hide the error box.
Finalising The Quiz
You may remember earlier, inside the questionAnswered function we checked if the current question had been answered, then we checked if all questions had been answered. Inside the second conditional we said we would add code to finalise the quiz. This is what we need to do now. Here is the code to help your memory:
1
2
3
4
5
6
7
if(DataService.quizQuestions[vm.activeQuestion].selected !== null){
  numQuestionsAnswered++;
  if(numQuestionsAnswered >= quizLength){

    // more code later
  }
}
You may be wondering why we have the line numQuestionsAnswered >= quizLength rather than simply numQuestionsAnswered === quizLength. I mean, if all questions have been answered numQuestionsAnswered will be exactly equal to the length of the quiz. Right?
The problem is that we do not stop the user from clicking continue on the same answered question twice. For example, the user answers question 1 and clicks continue which will call the questionAnswered function and increment numQuestionsAnswered and move us to question two.
Now suppose that the user realises the answer they gave to question one was wrong. So they go back to question one, change their answer and click continue again. This will then call the questionAnswered function and increment numQuestionsAnswered.
This leaves us in a position where numQuestionsAnswered is 2 but the actual number of questions that have been answered is only 1. This is why we need to have a >= check.
This then leads us to a situation where the user may have numQuestionsAnswered greater than or equal to the length of the quiz but they still haven’t answered all the questions. So we need to add a final sanity check that loops through all the questions just to make sure they are all answered.
1
2
3
4
5
6
7
8
9
10
11
12
13
if(numQuestionsAnswered >= quizLength){

  for(var i = 0; i < quizLength; i++){

    if(DataService.quizQuestions[i].selected === null){
      setActiveQuestion(i);
      return;
    }
  }

  // More code here shortly

}
We call setActiveQuestion and pass in i as an argument. We do this because we know that at index i, the question isn’t answered, because the if statement triggered. So we don’t need to waste computations trying to find the unanswered question, we can just pass it in.
When setActiveQuestion is finished, we return from the function. This is because if we didnt return, the function would keep running and get down to the line below that again calls setActiveQuestion. There is no need for this, so we just return from the function.
All Checks Passed, Time To End The Quiz
If all questions have indeed been answered, then the if statement will never trigger and we won’t call setActiveQuestion or return from the function, the code below the for loop will start to run. So this is where we add the code to do the housekeeping for the quiz before we move onto the results.
1
2
3
4
5
6
7
8
9
10
11
12
13
14
15
if(numQuestionsAnswered >= quizLength){

  for(var i = 0; i < quizLength; i++){

    if(DataService.quizQuestions[i].selected === null){
      setActiveQuestion(i);
      return;
    }
  }

  vm.error = false;
  vm.finalise = true;
  return;

}
The finalise property also needs to be initialised at the top of the controller, so don’t forget to do that.
Using the finalise property that is set to true when all questions have been answered we can display a little prompt that asks the user if they are sure they want to continue to the results, or if they would like to stay on the quiz to change some answers.
All Done Here, More In Part 17
This is what we will tackle in the next part. After that we will be able to create the third and final controller – the results controller.
See you in part 17.
Adrian
Please give this post a share if you enjoyed it. Everyone needs that awesome friend to send them amazing stuff.