AngularJS Quiz App Tutorial Part 4 - Bootstrap Modal Functionality
Please share this post if you enjoy it!
Bootstrap Modal Markup And Other CSS
We made a good start on our bootstrap markup in last part but we did end up leaving a few little issues with the CSS most notably the image sizing was not consistent. So let’s kick things off this time by just fixing up those problems. Then we will start creating the bootstrap modal.
If you want to see the app in action, check it out here
The git repo can be found here.
The next part can be found here.
Fixing Image Sizing Issues
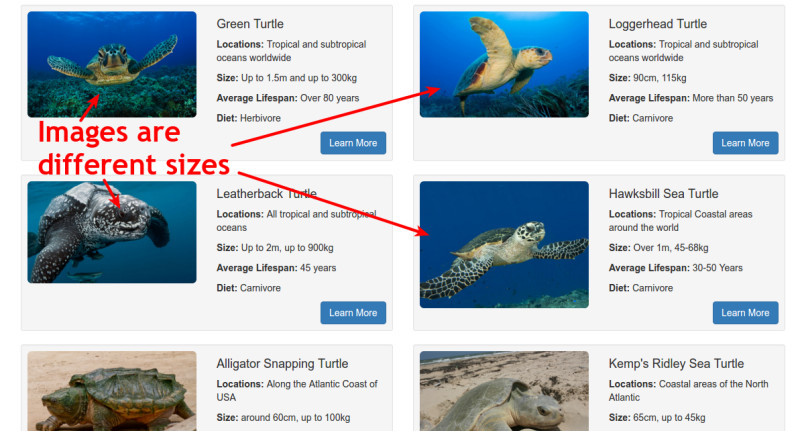
We will get ourselves ready for resizing images by adding a class to each of the image tags in our HTML.
1
2
<img ng-src="{{turtle.image_url}}"
     class="img-rounded img-responsive well-image">
The class we use here is well-image, but we could use anything that we want here. Now, inside our style.css file which lives in our CSS folder we can create some rules for our well-image class.
1
2
3
4
.well-image{
  width: 100%;
  height: 162px;
}
We’ve given to the width of 100% just to ensure that the images always the full width of its container. The height could be any value that you choose I’ve just decided on 162 pixels due to some trial and error.
Let’s Make The Modal Pop Up!
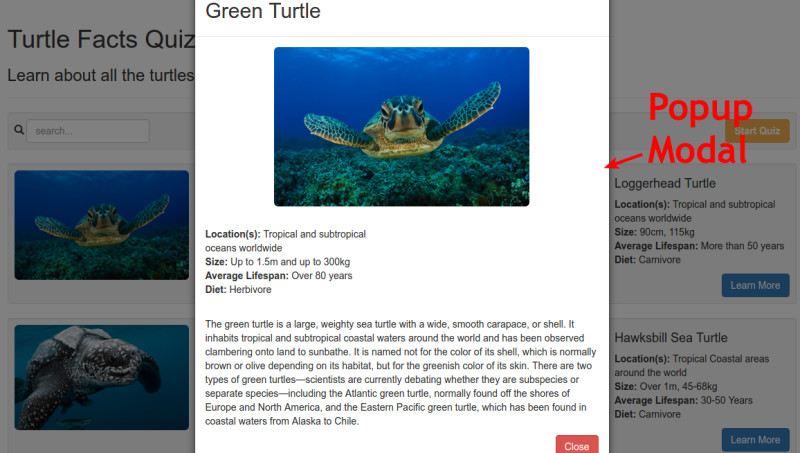
We want the modal to pop up on the screen when the user clicks the ”Learn More” button for any one of the turtles. This will be achieved using some functionality that is built into bootstrap. We will also need to trigger some controller functionality when the button is clicked and we will do that with a new Angular directive called ng-click
We will add this new ng-click directive to the button along with the data-toggle and data-target attributes that we added in the previous part. Inside the quotes for the ng-click we give it the function that we want to trigger on the click event.
1
2
3
4
<button class="btn btn-primary pull-right"
        data-toggle="modal"
        data-target="#turtle-info"
        ng-click="list.changeActiveTurtle(turtle)">Learn More>/button>
In this case we have called the function changeActiveTurtle, into which we pass turtle, which if you remember from the previous part is the alias given to each iteration of the ng-repeat.
So what this means for us is that when we click on the learn more button on any one of the individual Turtles the function will be passed the data for that particular turtle.
The function will then use this turtle information passed to it by the ng-click event to manipulate a property on our controller which indicates the currently active turtle.
It will then be the data associated to this currently active turtle property that we use to populate the modal with data. We will of course, have to create this function later.
Inside the Angular Controller – Moar Properties
Before we create the function that manipulates the active turtle property we have to actually create that property on our controller. As there is nothing active when the application first loads we will just initialise this property to an empty object.
We use an object because the property will eventually be set to one of the sets of turtle data in our JSON, which are obviously objects.
1
2
3
4
5
6
7
function ListController(){
  var vm = this;

  vm.data = turtlesData;
  vm.activeTurtle = {}; // will be used in the view to hold the data of currently active turtle

}
Now I need to create a function that will manipulate this active turtle property. Again, it would be perfectly fine to declare this function and set it equal to an anonymous function something like this.
1
2
3
4
5
6
7
8
9
10
11
12
function ListController(){
  var vm = this;

  vm.data = turtlesData;
  vm.activeTurtle = {}; // will be used in the view to hold the data of currently active turtle

  //This is one way you could declare the function, but not my preferred method
  vm.changeActiveTurtle = function(){
    // Code Here
  }

}
However, as you already know I prefer to declare the function by setting it a property equal to a named function and then declaring that named function further down in our controller. Something like this.
1
2
3
4
5
6
7
8
9
10
11
12
13
function ListController(){
  var vm = this;

  vm.data = turtlesData;
  vm.activeTurtle = {}; // will be used in the view to hold the data of currently active turtle

  // This is my preferred method
  vm.changeActiveTurtle = changeActiveTurtle;

  function changeActiveTurtle(){
    // Logic in here
  }
}</pre>
So now let’s create the logic inside the changeActiveTurtle function. When we called the function in the ng-click we pass today in the value of turtle which is the current index of the button that we clicked on and the data associated with that index. So we will need to give our functions in the controller some arguments.
The actual logic inside the function is only a single line of code that grabs hold of the activeTurtle property from within our controller and set equal to the index data that we passed into the function.
1
2
3
4
5
6
7
8
9
10
11
12
13
function ListController(){
  var vm = this;

  vm.data = turtlesData;
  vm.activeTurtle = {}; // will be used in the view to hold the data of currently active turtle

  // This is my preferred method
  vm.changeActiveTurtle = changeActiveTurtle;

  function changeActiveTurtle(index){
    vm.activeTurtle = index;
  }
}
HTML Markup For The Bootstrap Modal
Now every time the learn more button is clicked the ng-click directive will trigger the changeActiveTurtle function which will set the active turtle to an object that contains all of the data associated with the turtle the user wants to learn more about.
We can now use this data in the modal. This allows us to create a generic modal with placeholders using the {{}} Angular syntax that will then just insert the active turtle data as and when a particular turtle is clicked on.
So now it’s time to create HTML for this bootstrap modal and insert the angular bindings into it. We’ll start off by just creating a div for the modal and giving it the ID that we referenced in the data-target attribute earlier – turtle-info. Along with this will also add a few more divs which are required by bootstrap to create a modal.
1
2
3
4
5
6
7
8
9
<div class="modal" id="turtle-info">
  <div class="modal-dialog">
    <div class="modal-content">
      <div class="modal-header">

      </div>
    </div>
  </div>
</div>
A Little Reminder About The JSON
At the top of the modal area we want to display the name of the turtle that is being displayed. We will add this into an H2 tag inside a modal header div. Inside the H2 is where we will use the {{}} syntax to grab hold of the name of the currently active turtle.
Because the active turtle object is just one of the objects inside the JSON which looks something like the below snippet. Using the dot operator on the activeTurtle object, we are able to grab hold of the type, the locations, the image_url etc.
1
2
3
4
5
6
7
8
9
10
11
12
13
14
15
16
17
18
19
20
{
  type: "text",
  text: "Where does the Kemp's Ridley Sea Turtle live?'",
  possibilities: [
    {
      answer: "Tropical waters all around the world"
    },
    {
      answer: "Eastern Australia"
    },
    {
      answer: "Coastal North Atlantic"
    },
    {
      answer: "South pacific islands"
    }
  ],
  selected: null,
  correct: null
}
So now with the H2 added into our modal the code looks like this.
1
2
3
<div class="modal-header">
  <h2>{{list.activeTurtle.type}}</h2>
</div>
When I want some responsive code that will centre a large image of the turtle inside the mobile. We will make a div that is 8 columns (out of the possible 12) wide and then offset it by two columns to give it to columns of space on each side to make up the full 12 and that the div is centred.
1
2
3
4
5
6
7
8
9
10
11
12
13
14
<div class="modal-content">
  <div class="modal-header">
    <h2>{{list.activeTurtle.type}}</h2>
  </div>

  <div class="model-body">
    <div class="row">
      <div class="col-xs-8 col-xs-offset-2">
        <img ng-src="{{list.activeTurtle.image_url}}"
            class="img-rounded img-responsive">
      </div>
    </div>
  </div>
</div>
The code inside the ng-src is exactly the same as what we’ve seen earlier except we are referencing the image_url on the activeTurtle property instead.
Adding The Text Info About The Turtle
To finish off the modal markup we want to create the area that will hold all of the text data about our turtle. This code should look very familiar to you so I won’t explain it in depth.
1
2
3
4
5
6
7
8
9
10
11
12
13
14
15
16
17
18
19
20
21
22
<div class="modal-content">
  <div class="modal-header">
    <h2>{{list.activeTurtle.type}}</h2>
  </div>
  <div class="modal-body">
    <div class="row">
      <div class="col-xs-8 col-xs-offset-2">
        <img ng-src="{{list.activeTurtle.image_url}}" class="img-rounded img-responsive">
      </div>
    </div>
    <div class="row">
      <div class="col-md-6">
        <p><strong>Locations: </strong>{{list.activeTurtle.locations}}</p>
        <p><strong>Size: </strong>{{list.activeTurtle.size}}</p>
        <p><strong>Average Lifespan: </strong>{{list.activeTurtle.lifespan}}</p>
        <p><strong>Diet: </strong>{{list.activeTurtle.diet}}</p>
      </div>
    <div class="col-xs-12">
      <p>{{list.activeTurtle.description}}</p>
    </div>
  </div>
</div>
At this point the text to slightly too close to the image and the description is too close to the bullet point so we want to just add a bit of margin at the top of these areas just to make it look a bit nicer.
We will add a class of top-buffer to the row contains all of the text currently. Then we will create this CSS rule.
1
2
3
.top-buffer{
  margin-top: 30px;
}
The final things to do in our model is to add the close button that will return us back to the list view. To do this will just create a simple button element and add some bootstrap classes to style it and float it right. A bootstrap attribute called data-dismiss is what will actually allow the button to exit the modal.
1
2
3
4
5
6
<div class="col-xs-12 top-buffer">
  <p>{{list.activeTurtle.description}}</p>

  <button class="btn btn-danger pull-right"
          data-dismiss="modal">Close</button>
</div>
See You In The Next Part
That about wraps it up for this tutorial so I hope to see you over in the next part where we will start to tackle my favourite part of the application. In fact, it’s one of my favourite features within the entirety of angular – using filters to create automatically updating search results.
So I will see you over there in part 5.
Adrian
Please give this post a share if you enjoyed it. Everyone needs that awesome friend to send them amazing stuff.