AngularJS Quiz App Tutorial Part 23 – Ng-If (Again)
Please share this post if you enjoy it!
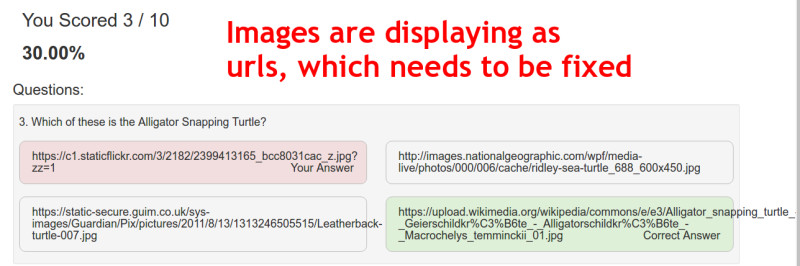
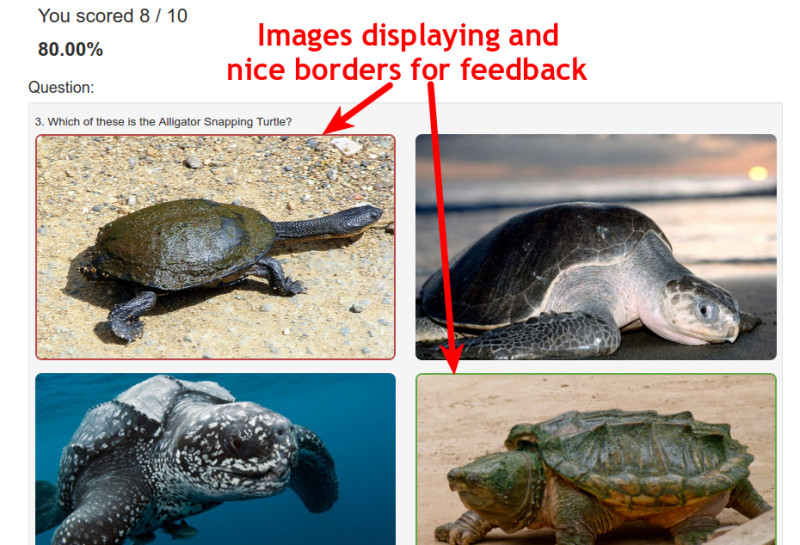
Our Old Enemy – The Image Questions
When we created the quiz controller we had the problem of the image urls displaying instead of the images themselves on image questions. We again face this problem in the results controller. Having already solved it once though, it should pose no problems to us now. We will use the Angular ng-if directive to fix the problem again.
If you want to see the app for yourself, check it out here
The git repo can be found here.
The next part can be found here
This time we want the images to display nicely but also want a border around the correct answer and if the user chose an incorrect answer, a border around the answer they selected. Both will provide feedback to the user.
Like we did in the quiz controller we just duplicate the row that contains the text questions and modify it slightly to house the image questions.
1
2
3
4
5
6
7
8
9
10
<div class="row">
  <div class="col-sm-6" ng-repeat="answer in results.dataService.quizQuestions[results.activeQuestion].possibilities">

    <div class="image-answer"
      ng-class="results.getAnswerClass($index)">
        <img ng-src="{{answer.answer}}">
    </div>

  </div>
</div>
Now on the div with the class image-answer we will also give it an ng-class and pass in the same function we used earlier – getAnswerClass. You may say that this function returns one of two bootstrap classes, neither of which will give the images a border. You would be right.
Doing it this way cuts down on the code logic we need and we can just hook into those bootstrap classes using specificity on top of the image-answer class that the div already has to give it the required borders.
The two classes that the function can choose from is bg-success and bg-danger which are given to correct and incorrect answers respectively. We can now use those and hook into them in our own css.
Add the following to your stylesheet.
1
2
3
4
5
6
.image-answer.bg-success{
  border: 3px solid #5ea640;
}
.image-answer.bg-danger{
  border: 3px solid #b74848;
}
Return Of The Angular Ng-If Directive
Again, we only want to render one block or the other – either the text answer block or the image block, but never both. This is where ng-if comes into play again. Here are the two blocks with their respective ng-if statements added onto them.
1
2
3
4
5
6
7
8
9
10
11
12
13
14
15
16
17
18
19
20
21
22
23
24
25
26
27
28
29
<div class="row"
  ng-if="results.dataService.quizQuestions[results.activeQuestion].type === 'text'">

    <div class="col-sm-6" ng-repeat="answer in results.dataService.quizQuestions[results.activeQuestion].possibilities">
      <h4 class="answer"
        ng-class="results.getAnswerClass($index)">
          {{answer.answer}}

          <p class="pull-right"
            ng-show="$index !== results.quizMetrics.correctAnswers[results.activeQuestion] && $index === results.dataService.quizQuestions[results.activeQuestion].selected">Your Answer</p>
          <p class="pull-right"
            ng-show="$index === results.quizMetrics.correctAnswers[results.activeQuestion]">Correct Answer</p>
      </h4>
    </div>

</div>


<div class="row"
  ng-if="results.dataService.quizQuestions[results.activeQuestion].type === 'image'">

    <div class="col-sm-6" ng-repeat="answer in results.dataService.quizQuestions[results.activeQuestion].possibilities">

      <div class="image-answer"
        ng-class="results.getAnswerClass($index)">
          <img ng-src="{{answer.answer}}">
      </div>
    </div>
</div>
You can see that the statements are identical except for the type we are testing for. Image and text.
Now the app is pretty much in its completed state. We just need to give the user a way to return back to the fact page and start everything over again if they wish. Of course, we will need to reset everything when we go back as well, just so that it is a fresh start if the user wants to try again.
I will see you in the final part where we add that button and logic.
See you in part 24
Adrian
Please give this post a share if you enjoyed it. Everyone needs that awesome friend to send them amazing stuff.